How to add a rotating banner to your website storefront to uniquely brand your website.
| Widget Connector | |||||
|---|---|---|---|---|---|
|
...
|
...
|
Step-by-Step Guide
Login to your administration panel admin.yourwebsiteaddress.com
If your front page slideshow is not enabled, or to ensure it is, visit SETTINGS > SETTINGS CATEGORIES > CMS > Home Page Image Slider and verify or set this setting to ON.

Navigate to STOREFRONT CMS > CMS FEATURES > IMAGE SLIDER
Click the ADD NEW SLIDE button.
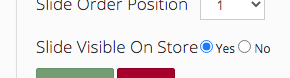
Assign a Title, Description, Slide Destination (where the user will be taken if the slide is clicked, be sure to set your URL to https:// so the banner links to the secure side of your store), Slide Window Target, and if you have multiple banners in rotation, select the number to represent the order in which this banner should appear in the rotation.
Click SAVE. After you press save, a dialog will appear informing you to select your image to upload for your banner.
Browse for and select your banner image file
Click the UPLOAD SLIDER IMAGE button.
Ensure the SLIDE IS VISIBLE ON STORE option is set to YES
Repeat steps 3-7 for each banner you would like to display.
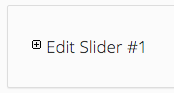
To edit existing banners, click the +EDIT SLIDER #1, #2, etc. button that corresponds to the banner you want to edit.
Related articles
| Filter by label (Content by label) | ||||||||||||||||||||
|---|---|---|---|---|---|---|---|---|---|---|---|---|---|---|---|---|---|---|---|---|
|
| Page Properties | ||
|---|---|---|
| ||
|